A Guide to Attaching a Headboard to the Wall for a Secure Bedroom

Here at Guynn Furniture & Mattress, we’ve seen it all since we first opened our doors in 1902. One of the simplest yet most effective upgrades for any bedroom is attaching your headboard directly to the wall. It’s about more than just aesthetics; it's a practical move that adds stability, protects your walls, and creates a clean, custom look that feels incredibly high-end.
A properly wall-mounted headboard puts an end to all that annoying rattling and bumping against the wall every time you shift. It’s a solid, secure solution that our families from Galax to Hillsville have come to appreciate for its quiet strength.
Why You Should Mount Your Headboard to the Wall
In our communities across Southwestern Virginia and Northern North Carolina, we value furniture that’s both beautiful and built to last. Securing your headboard to the wall is an upgrade that serves everyone in the family, whether you’re a Traditionalist who values our long-standing history since 1902 or a Value Seeker making a smart investment in your home’s longevity.
This isn’t just a niche trend, either. It’s catching on for a reason. Recent data shows that 68% of new homeowners in urban and suburban areas are choosing wall-attached furniture to make the most of their floor space. It’s a small change that has a surprisingly big impact on how a room feels and functions.
The Benefits of a Wall-Mounted Headboard
We believe in making home design simple and effective. Here are a few of the top reasons our neighbors are choosing to wall-mount their headboards.
- Unbeatable Stability and Safety: A headboard bolted to the wall is rock-solid. This is a game-changer for households with active kids or pets who might bump into the bed. You get a level of peace of mind that a frame-attached headboard just can't offer. No more shifting, rattling, or thumping.
- A Cleaner, More Polished Look: Wall-mounting gives your bed an integrated, built-in appearance that instantly elevates the room. It’s a professional touch that works wonders, whether you have a timeless headboard from our La-Z-Boy Showcase or a beautiful, durable piece from Ashley.
- Protection for Your Home: By creating a secure attachment, you prevent the headboard from constantly rubbing against your paint or wallpaper. This stops scuffs and scrapes before they start, keeping your walls looking fresh for years to come.
For many of us, our bedroom is our sanctuary. Attaching your headboard to the wall is a small project that pays off with big rewards in comfort, safety, and style, contributing to that truly relaxing atmosphere we all crave.
Choosing the right method can feel a little daunting, but it really comes down to your headboard's weight and your wall type.
Choosing Your Headboard Mounting Method
Here's a quick comparison of the most common methods for attaching a headboard to the wall. This will help you decide which approach is right for your home and skill level.
| Mounting Method | Best For Wall Type | Difficulty Level | Key Benefit |
|---|---|---|---|
| French Cleats | Drywall, Plaster, Masonry | Medium | Very strong and secure; distributes weight evenly. |
| Flush Mount Brackets | Drywall, Plaster | Easy | Simple to install and keeps the headboard tight to the wall. |
| Direct-to-Studs | Drywall, Plaster | Medium | Extremely sturdy for heavy headboards; requires a stud finder. |
| Strap-and-Hook | All Types | Easy | Good for lightweight headboards or renters; minimal wall damage. |
No matter which method you choose, the key is ensuring you have a solid anchor point. Taking a few extra minutes to find a stud or use the proper wall anchors will make all the difference.
At Guynn Furniture & Mattress, helping families create their dream homes is what we do. A great bedroom is about creating a space that’s both functional and serene, and we've got plenty of ideas for designing a relaxing bedroom to help you set the perfect tone. And if you’d rather leave it to the pros, just say the word. Our Free in-home delivery and setup within 60 miles means you can have a perfectly installed headboard without lifting a finger.
Gathering Your Tools and Hardware
Just like any good home project, a little prep work goes a long way. Before you even think about attaching your headboard to the wall, let's get your tools and hardware lined up. There’s nothing worse than getting halfway through a project only to realize you’re missing a crucial piece.
Think of this as your pre-flight checklist. Having everything you need from our large in-stock selection on hand from the start is the secret to a smooth, frustration-free installation, whether you’re in a newer home in Hillsville or a beautiful historic house in Galax.
Essential Tools for the Job
You probably have most of what you need right in your toolbox. A few of these items, however, are absolutely non-negotiable if you want a headboard that’s straight, secure, and perfectly placed.
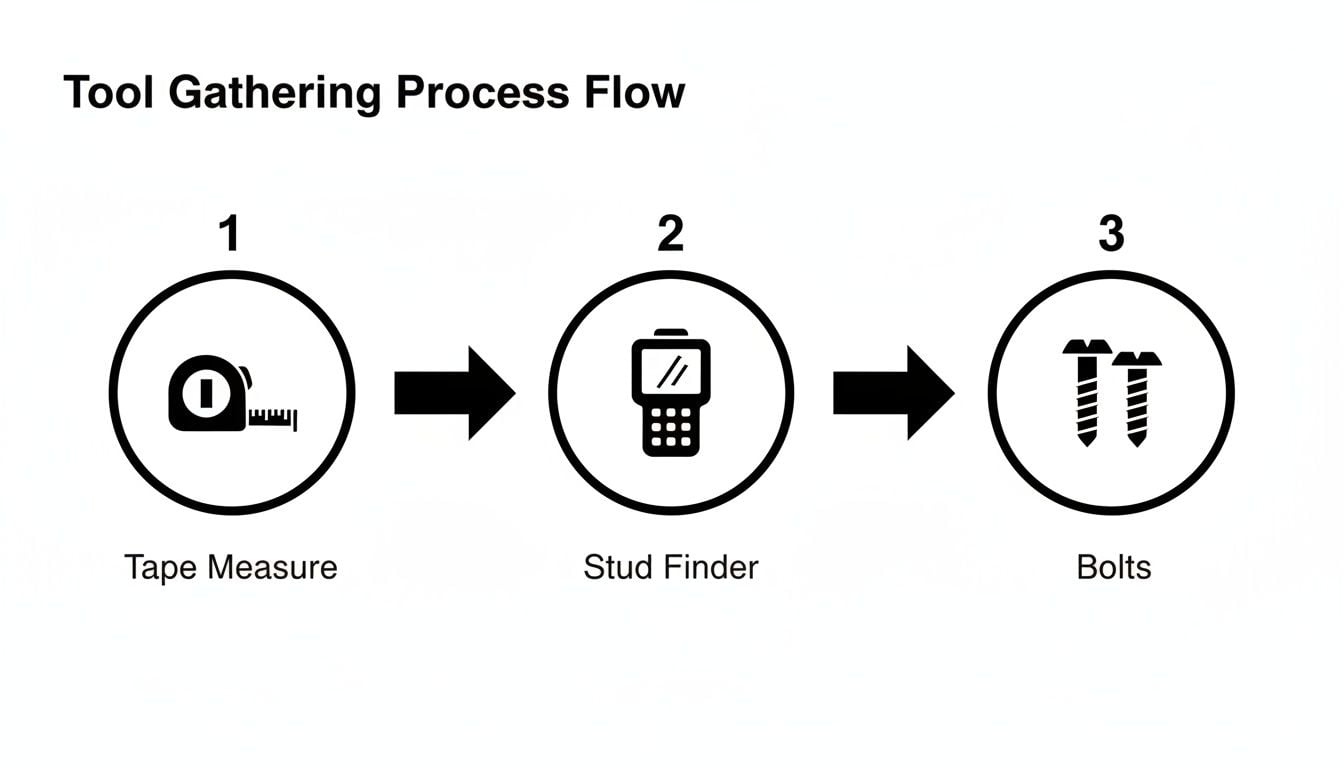
- Stud Finder: This is your best friend for this project. Anchoring directly into a wall stud is by far the safest and most secure way to mount a headboard.
- Tape Measure: Precision is everything here. You’ll need it to center the headboard and get the height exactly right. If you need a quick refresher, our guide on how to measure furniture can help.
- Level: A 24-inch or 48-inch level is ideal. Trust us, nothing throws off the entire look of a bedroom faster than a slightly crooked headboard.
- Pencil: Simple, but essential for marking your measurements on the wall.
- Drill with Drill Bits: Any standard power drill will do the job. Just make sure you have the right-sized bits for the screws and anchors you end up using.
Choosing the Right Hardware
The hardware you choose is completely dependent on what your walls are made of. Using the wrong anchor won’t just lead to a wobbly headboard—it could cause some serious damage to your wall.
The most common mistake we see is people using standard drywall anchors for a heavy, solid wood headboard. For something you'll lean against, like a beautiful piece from our Bassett collection, you absolutely want to anchor it into a wall stud. It’s the only way to guarantee it's safe and secure.
When you're making your hardware list, don't forget to consider specialized items. For heavier or more unique headboards, you might need a set of sturdy wall mounting brackets.
If you can't hit a stud in standard drywall, toggle bolts or molly bolts are your next best bet. For plaster or masonry walls—common in many older homes in our region—you'll need specific masonry screws and anchors designed to grip tightly into brick or concrete.
Here at Guynn Furniture & Mattress, we've been helping families across the Southwestern Virginia and Northern North Carolina region find and set up the perfect furniture since 1902. If you're ever unsure about what you need for a project, just ask. We're always happy to share what we know in a friendly, no-pressure atmosphere.
Your Guide to a Secure Headboard Installation
Alright, you've got your tools, and you’re ready to get that headboard on the wall. This is the part that transforms the look of a bedroom, giving it that finished, high-end feel. Whether it’s a stunning Bassett headboard or a comfortable La-Z-Boy piece, a secure wall mount is what makes it look professional.
First thing's first: let’s figure out the height. A good rule of thumb is to set the bottom edge of the headboard a few inches below the top of your mattress. This simple step prevents that frustrating gap where pillows love to disappear.
Get someone to help you hold it in place. Step back and take a look. Sometimes the best measurement is simply what looks right to your eye. Once you’ve found that sweet spot, use a level to make sure it's perfectly straight and lightly mark the top corners with a pencil.
Marking and Drilling for Different Wall Types
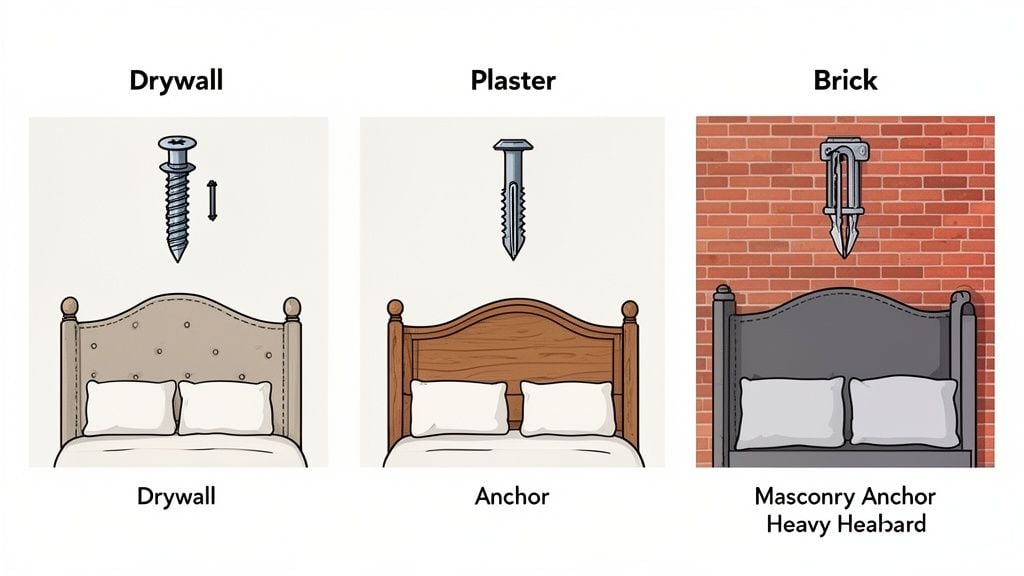
This next step is where a secure installation is either made or broken. You have to anchor it properly, and the right method depends entirely on what your walls are made of. This varies a lot in homes across Southwestern Virginia and Northern North Carolina.
- Drywall: Your best friend here is a stud finder. Locating and anchoring directly into the wall studs is always the strongest method. If the studs don't line up perfectly with your headboard's mounting points, you'll need to use heavy-duty toggle or molly bolts rated for the headboard’s weight.
- Plaster: Many older homes in Galax and Independence have classic plaster walls. These can be brittle, so drilling pilot holes first is non-negotiable if you want to avoid cracks. A stud finder can work, but be warned—the wooden lath behind the plaster can give false readings. If you can’t find a stud, toggle bolts are your go-to for a solid hold.
- Masonry (Brick or Concrete): This is a different ballgame. You'll need a hammer drill and masonry bits. Mark your spots, drill the holes, and then insert specialized masonry sleeves or anchors. This gives your mounting hardware something substantial to grip onto.
Here’s a little trick we use to keep the mess down: before you drill, take a piece of painter's tape, fold it in half to create a small ledge, and stick it to the wall just below your mark. It’s an easy way to catch most of the dust and makes cleanup a breeze.
This simple diagram shows the key tools you'll need for a precise and secure installation.
Securing the Headboard with Different Mounts
With your holes prepped, it's time to install the hardware. For wall-mounted headboards, two of the most reliable methods are French cleats and direct-to-wall mounts.
A French cleat system is a fantastic choice, especially for heavier headboards. It uses two interlocking pieces of wood or metal cut at an angle. One goes on the wall, the other on the back of the headboard. When you hang it, they lock together, creating an incredibly strong, invisible mount that distributes weight evenly. It’s a favorite method of our delivery team for a reason.
Direct-to-wall mounts are more straightforward. You’ll attach brackets to the headboard, then screw them into the wall using the anchors appropriate for your wall type. The process is very similar to hanging a heavy mirror or piece of art. Just be sure to double-check that everything is level one last time before you tighten the final screws. It’s that final detail that makes your beautiful Ashley or La-Z-Boy headboard look perfect.
For more tips on getting things straight, check out our step-by-step guide to hanging your picture with precision.
Once the hardware is on the wall, carefully lift your headboard and lock it into place. Give it a firm but gentle tug to make sure it's not going anywhere. Then, slide your bed frame back, step back, and admire a job well done.
Adapting to Different Headboards and Wall Types
Here in Southwestern Virginia and Northern North Carolina, we know every home has its own story and its own quirks. One day we're helping a family in Hillsville mount a sleek, upholstered headboard to brand-new drywall, and the next we're in Galax, carefully securing a heavy, antique wooden one to a historic plaster wall.
Success comes down to matching your technique to the task. Not every project is a simple stud-finder-and-drill job. This is where a bit of practical experience—the kind we’ve gathered since 1902—really makes a difference. The trick is to understand how your headboard’s style and your wall’s construction need to work together.
Upholstered vs. Solid Wood Headboards
The first thing to consider is what your headboard is made of. This will dictate how you secure it. A lightweight, fabric-covered headboard from Ashley, for instance, puts far less strain on a wall than a solid oak piece from our Bassett collection.
- Upholstered Headboards: These are typically lighter and more forgiving to hang. If you can’t hit a stud, you can often get away with using heavy-duty drywall anchors. A word of caution: be careful when drilling through the fabric to avoid snags. For more on different fabrics, see our guide on everything you need to know about upholstery materials.
- Solid Wood or Metal Headboards: These are the heavyweights, and they demand a rock-solid anchor. Always try to mount directly into studs. If the studs just aren't cooperating, you absolutely must use high-capacity toggle bolts or even a French cleat system to distribute the weight across a wider section of the wall.
When Wall Studs Don't Cooperate
It’s the classic DIY headache: you’ve found the perfect spot for your bed, but the studs are nowhere to be found. Don't panic. You still have options for creating a secure anchor point, even when the wall’s structure isn’t playing along.
The safest bet for a heavy headboard without perfectly placed studs is to create your own mounting surface. You can do this by mounting a horizontal board (a 1×4 painted to match the wall works great) directly into the studs, wherever they are. Then, you can attach your headboard securely to that board. It’s one extra step, but it guarantees a rock-solid installation every time.
For new homeowners in our community who are visualizing their space, our expert design staff, including Debra Williams, can help create scaled room layouts that incorporate these smart solutions. With our Low Price Promise and flexible financing, a beautiful new bedroom is always within reach for any budget-friendly Value Seeker.
The rise of wall-mounted headboards goes hand-in-hand with the growing need for space-saving bedroom furniture. Industry reports show the wall beds market continues to grow. If any project feels a bit too tricky, our team is always here to help you plan a safe installation, whether it’s for a La-Z-Boy, Sealy, or Therapedic setup. We want it to be perfect.
Knowing When to Call for Professional Help
Sometimes, the smartest DIY decision you can make is knowing when to hang up the tool belt and call in a helping hand. We’re all for the satisfaction of a project well done, but there’s no shame in recognizing when a job is best left to the pros.
Your safety, your home, and your beautiful new furniture are what matter most. If you’re staring down an unusually heavy headboard—like a king-size solid wood piece from our Bassett collection—or facing a tricky wall like old plaster or masonry, it’s wise to pause. A simple mistake can lead to a damaged wall or, even worse, a headboard that isn’t truly secure.
When Professional Installation Just Makes Sense
Think about your specific situation. We see a few common scenarios where our neighbors in Galax, Independence, and Hillsville find that professional help is the smartest, safest choice.
- Extremely Heavy or Oversized Headboards: If it takes two people just to struggle with lifting the headboard, mounting it safely will be a whole other challenge.
- Complex or Old Walls: Older homes with plaster and lath, or walls that might hide plumbing and wiring, require a delicate and experienced touch. You don't want to turn a small project into a major repair.
- You Don’t Have the Right Tools: If you’re missing a good stud finder, a powerful drill, or the correct anchors for your wall type, the cost of buying them can easily outweigh the convenience of having an expert handle it.
- You Simply Don't Feel Confident: Your peace of mind is priceless. If the thought of drilling into your walls is causing you stress, that’s the best reason of all to let someone else take over.
Safety should always be the priority. According to market analysis, improper anchoring is a leading cause of installation failure. Professional installation significantly lowers that risk, ensuring your bedroom is a safe and secure space for your family. Read more about these important safety and installation trends on snsinsider.com.
Our Team Is Here for You
This is exactly why we offer Free in-home delivery and setup within 60 miles of our stores. Our experienced delivery team has installed countless headboards from top brands like Sealy and Therapedic. They know exactly how to handle every wall type and will make sure your furniture is perfectly placed and secure, with no stress or mess for you.
If you've designed a special look and need guidance on bringing it all together, you can also learn more about how our custom furniture services make it simple.
And for projects that might extend beyond what our team typically handles, consider contacting professional handyman services for expert assistance. Our goal is your complete satisfaction, whether you do it yourself or let us do it for you.
Frequently Asked Questions About Mounting Headboards
Here at Guynn Furniture & Mattress, we hear a lot of great questions in our showrooms across Southwestern Virginia and Northern North Carolina. We’ve been helping our neighbors solve furniture puzzles since 1902, so we’ve pretty much seen it all. Let's walk through some of the most common questions about attaching a headboard to the wall.
How High Should I Mount My Headboard?
This is probably the number one question we get, and for good reason! A great starting point is to position the bottom edge of the headboard just a few inches below the top of your mattress. For a typical setup, say a 12-inch mattress on a 10-inch frame, the bottom of the headboard might land around 20 inches from the floor.
The real goal here is to close that annoying gap where your pillows always seem to disappear. Before you even think about drilling, grab a friend to help you hold the headboard in place. Hop into bed, sit up like you normally would, and see how it feels and looks. Your comfort is what matters most.
Can I Attach a Headboard to the Wall in a Rental Property?
That’s a smart question, and the answer is almost always found in your lease agreement. Mounting a headboard involves drilling holes, which most landlords consider damage that could come out of your security deposit.
We always, always recommend checking with your landlord before starting any project that alters the walls. If drilling is a no-go, don't worry! You can still get a fantastic look with a freestanding headboard or one that attaches directly to the bed frame.
What If There Are No Studs Where I Want to Place My Headboard?
This is a classic problem, but you definitely have options. If you’re working with a lighter headboard, like many of the modern upholstered styles from Ashley, you can often use heavy-duty drywall anchors. Just make sure they're rated to hold significantly more weight than the headboard itself.
For heavier pieces made of solid wood or metal, like a beautiful headboard from Bassett, anchoring directly into studs is the only truly safe choice. If the studs don't line up where you need them, you can create your own sturdy mounting surface.
Here's the professional trick our team uses:
- First, get a sturdy horizontal board, like a 1×4, and paint it to match your wall. This will be your support ledger.
- Use your stud finder to locate the wall studs, and screw this support board securely into at least two of them.
- Now you have a rock-solid surface to attach your headboard to—exactly where you want it.
This method gives you the best of both worlds: perfect placement and the peace of mind that comes from anchoring into your wall's frame. It’s a pro tip that keeps your bedroom beautiful and, more importantly, safe for everyone.
Of course, if that sounds like more of a project than you bargained for, that’s what we’re here for. Our Free in-home delivery and setup within 60 miles of our stores in Galax, Independence, and Hillsville means our experienced team can handle the installation for you.
At Guynn Furniture & Mattress, we're committed to making your home comfortable and beautiful. Whether you're looking for a new bed from Sealy or Therapedic or just need a hand with a tricky installation, we're here to help in our friendly, no-pressure atmosphere.
Browse our selection online at guynnfurniture.net, visit our showrooms in Galax, Independence, or Hillsville to test the comfort for yourself, or schedule a consultation with our design team to start planning your dream room today.