How to Clean Wood Furniture: A Guide to Restoring Its Natural Beauty in 2026

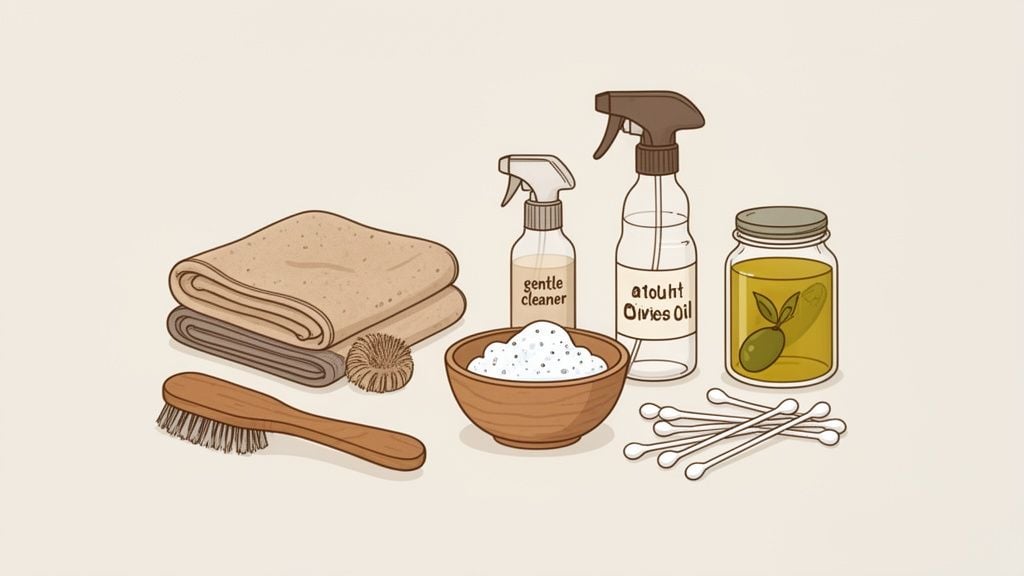
Before you even touch your wood furniture, the secret to a great clean lies in the tools you choose. The best approach is always a gentle one. Forget the aisle of harsh, specialized chemicals—you can build a fantastic cleaning kit with simple supplies you probably already have in your home.
Building Your Wood Furniture Cleaning Kit
Here at Guynn Furniture, our family has been helping folks in Galax, Independence, Hillsville, and the wider Southwestern Virginia / Northern North Carolina region find and care for furniture since 1902. We believe keeping your wood pieces beautiful shouldn't be complicated or costly. It's about using smart, simple basics that protect your investment.
This isn't just about protecting the finish on a Bassett or Ashley piece you love. It’s about creating a safe, welcoming home. Using gentle, often homemade solutions is the best way to care for your furniture and your family.
Your Core Cleaning Supplies
To get started, pull together a few go-to items. These are the essentials we recommend to all our neighbors across our community.
You don’t need much to get the job done right. Here’s a quick-reference table of our must-have tools.
| Your Essential Wood Furniture Cleaning Toolkit | ||
|---|---|---|
| Tool | Best For | Helpful Neighbor Tip |
| Microfiber Cloths | Dusting, damp cleaning, and polishing. | Have at least three on hand: one for damp work, one for drying, and one for applying polish. They trap dust instead of just pushing it around. |
| Mild Dish Soap | General cleaning of everyday grime and sticky spots. | Just a few drops in a bowl of warm water is all you need. More is not better here. |
| White Vinegar & Olive Oil | A homemade polish for certain sealed finishes. | Mix equal parts to create a simple solution that both cleans and conditions. Always test it on a hidden spot first! |
| Soft-Bristle Brush | Getting into carvings, crevices, and detailed work. | An old, clean toothbrush or a small paintbrush works perfectly for clearing out stubborn dust. |
With these simple items, you're equipped to handle most routine cleaning tasks safely and effectively.
What to Keep Out of Your Kit
Just as important as what you use is what you don't use. Steer clear of all-purpose sprays that contain harsh chemicals, anything with ammonia, and definitely avoid abrasive scouring pads.
These products can create a cloudy, dull buildup over time or, worse, scratch the delicate finish right off your treasured pieces. Keeping your kit simple is the safest path forward.
Did you know the average American household spends about 24 hours a month on cleaning? Having an efficient routine with the right tools not only preserves your furniture but also gives you back precious time.
When you're ready to tackle more than just furniture, you can get more ideas for refreshing your entire home in our guide on spring cleaning.
Establishing Your Daily and Weekly Dusting Routine
In our family, we think of dusting as a quick, friendly check-in with your furniture. It’s a simple habit that stops much bigger problems before they start. Dust isn't just an eyesore; its tiny, abrasive particles act like fine-grit sandpaper, creating microscopic scratches in the finish every time something moves across the surface.
This is especially true for the beautiful, high-quality wood furniture our neighbors in Galax, Independence, and Hillsville bring into their homes. Protecting the finish on your La-Z-Boy end tables or your Bassett dining set starts with this one small, consistent step. Learning how to clean wood furniture the right way really begins with an effective dusting routine.
The Right Tools and Techniques for Dusting
First, let's talk about what not to use. Feather dusters often just push dust into the air, only for it to settle right back where it was. The single most effective tool you can grab is a soft, clean microfiber cloth.
For the best results, our family always recommends this simple technique:
- Slightly Dampen the Cloth: A tiny bit of water is all you need—just enough to make the cloth feel damp, not wet. This moisture is what helps the microfiber grab and hold onto dust instead of just scattering it.
- Wipe with the Grain: Always follow the direction of the wood grain. This helps you lift dust out of the wood's natural texture without accidentally pushing particles deeper into the finish.
- Use a Dry Cloth to Finish: After your damp pass, quickly go over the surface with a second, dry microfiber cloth. This removes any lingering moisture and buffs the surface to a gentle shine.
This two-cloth method is our number one tip for preserving the beauty of your furniture. It’s a quick task that keeps your home looking welcoming and protects your investment for years to come.
"A consistent dusting routine is your furniture's first line of defense. By capturing abrasive particles before they can cause damage, you're not just cleaning—you're actively preserving the finish and extending the life of your cherished pieces."
Creating a Dust-Free Environment
Regular dusting does more than just protect your furniture; it dramatically improves the air quality in your home. By capturing dust, you’re also removing common allergens, which is a big win for everyone in our family.
If you want more ideas on this topic, check out our guide with essential tips for maintaining a dust- and allergen-free bedroom. This weekly habit truly is a cornerstone of caring for the furniture you love.
Deep Cleaning Different Types of Wood Finishes
Once the dust is settled (literally), it’s time to think about a deeper clean. But here’s the thing: not all wood finishes are the same. A brand-new, durable Ashley bedroom set with a modern varnish needs a completely different approach than a treasured, oil-finished family heirloom.
Using the wrong method can be a disaster, leaving behind a cloudy haze, a sticky residue, or even stripping the protective layer right off. It’s why our expert design staff, including Debra Williams, always tells our neighbors in Galax and Hillsville to first figure out exactly what kind of finish they’re working with.
Identifying Your Furniture's Finish
Before you touch your furniture with a cleaner, you need to play detective for a minute. The best way to do this is with a simple test in a spot nobody will ever see, like the back of a table leg or inside a cabinet door.
- Varnish & Lacquer (Sealed Finishes): These are the workhorses of modern furniture. Drop a single bead of water onto the surface. If it beads up and just sits there, you have a sealed finish. These are tough and built to resist moisture.
- Oil & Wax (Penetrating Finishes): Common on older or rustic pieces, these finishes soak right into the wood itself. A drop of water will slowly absorb, maybe leaving a slightly darker spot as it soaks in. These finishes need a gentler touch and more frequent care to keep them protected.
Even for a deep clean, the process always starts with dusting. This simple chart drives home just how basic the first step should be.
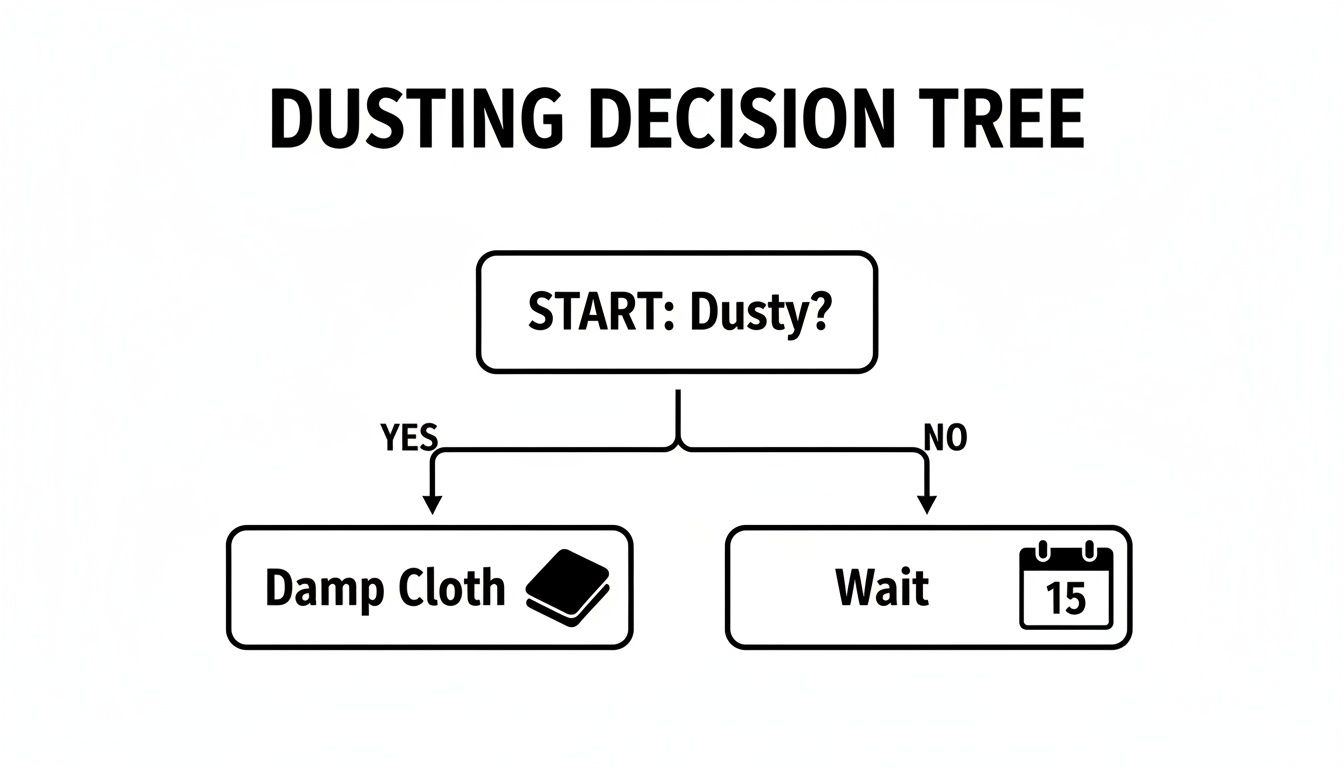
As you can see, a simple damp cloth is often your best friend. It reinforces our "gentle-first" philosophy perfectly.
Cleaning Sealed Finishes Like Varnish and Lacquer
Most of the furniture we deliver across Southwestern Virginia and Northern North Carolina, including beautiful pieces from La-Z-Boy, Sealy, and Bassett, comes with a tough, sealed finish. Good news—these are the easiest to clean.
Just mix a few drops of mild dish soap into a bowl of warm water. Dip a clean microfiber cloth into the solution and wring it out until it’s just barely damp. You don’t want to soak the wood.
Gently wipe down the surface, always moving in the direction of the wood grain. Immediately follow up with a separate, dry cloth to buff away any remaining moisture.
Caring for Oiled and Waxed Finishes
Furniture with an oiled or waxed finish needs a much lighter touch. Water-based cleaners are a no-go here, as they can cause spotting and damage the finish. For a deeper clean, you’ll want to stick with a cleaner specifically made for these penetrating finishes.
Our Helpful Neighbor Tip: For some sealed finishes, you can whip up a great homemade polish. Just mix equal parts white vinegar and olive oil. Apply a tiny amount with a soft cloth, rub it in gently, and then buff it off with a clean, dry cloth. Always test it on a hidden spot first!
For specialized outdoor pieces, knowing how to clean teak furniture can make all the difference in its appearance and lifespan.
How to Clean Painted Wood Furniture
Painted furniture is a bit of a wild card because the quality and type of paint can vary so much. If you have a piece with a high-gloss, factory-painted finish, you can generally use the same mild soap and water method as you would for varnish.
For anything with a matte, chalk-painted, or distressed finish, however, you have to be extra careful. Avoid scrubbing at all costs. A simple damp cloth is usually all you need. Cleaning too aggressively can easily lift the paint, especially on those intentionally distressed edges you love.
If you’re curious about what kinds of woods are often hiding beneath these beautiful finishes, our guide on choosing the right hardwood for longevity and style is a great place to start.
How to Remove Water Rings and Common Stains
No matter how careful you are, life happens. A glass of iced tea leaves a ghostly white ring on a beautiful La-Z-Boy coffee table, or a sticky fingerprint appears on a brand-new Bassett dresser. In our family’s business, we’ve been helping our neighbors in Galax, Independence, and Hillsville solve these little furniture emergencies since 1902.
Don’t panic—most common stains are easier to fix than you might think. We believe in providing solutions that are easy and affordable.
The real key is to act fast and know which remedy to reach for. From water marks to greasy smudges, these are the practical tips we trust for the furniture in our own homes across Southwestern Virginia and Northern North Carolina.
Tackling White Water Rings
That dreaded white ring from a cold glass is one of the most common issues we see. This isn't actually a stain in the wood itself, but moisture that’s become trapped in the top layer of the finish (like lacquer or varnish).
The good news? You can often draw that moisture out with something you already have in your home.
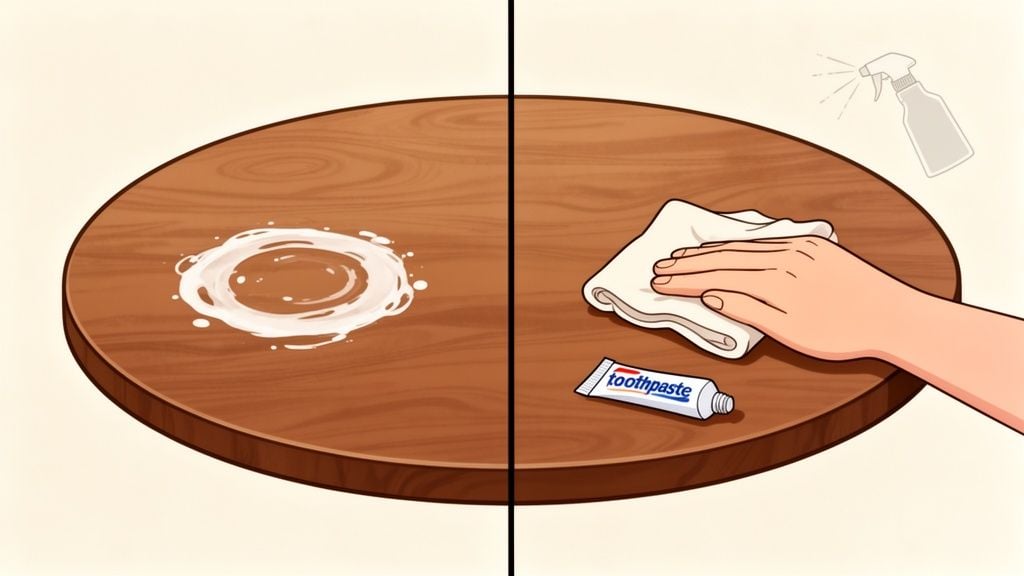
The Toothpaste Trick:
Yes, you read that right! A bit of plain white, non-gel toothpaste works wonders. Here’s how we do it:
- Put a small dab of white toothpaste on a soft, clean cloth.
- Gently rub the paste onto the white ring, always moving in the direction of the wood grain.
- Don’t scrub too hard. Let the mild abrasive in the toothpaste do the work for a minute or two, then wipe the area clean with a separate damp cloth and dry it immediately.
The toothpaste gently buffs the finish and creates a tiny bit of heat, which helps that trapped moisture evaporate. We've found this method is surprisingly effective on modern sealed finishes, like those you’ll see on many of our in-stock Ashley pieces ready for immediate delivery.
Removing Greasy Smudges and Sticky Residue
Fingerprints, food smudges, or the sticky aftermath of a price tag can leave an annoying film on your furniture. For these oily or adhesive-based spots, you need a cleaner that can cut through the grease without damaging the wood's finish.
A simple solution of equal parts water and white vinegar with a single drop of mild dish soap is perfect. The vinegar helps break down oils, while the soap lifts the grime away. As always, apply it with a barely damp cloth, wipe gently, and dry the surface completely.
Our Helpful Neighbor Tip: For extra-stubborn sticky residue, like from a sticker, apply a small amount of mineral oil to the spot and let it sit for a few minutes. The oil helps dissolve the adhesive, allowing you to gently wipe it away without scraping.
Handling Dark Stains and Ink Marks
If a water ring looks dark or black, it means moisture has penetrated through the finish and stained the wood itself. Ink from a stray pen mark can be just as difficult to remove for the same reason. These types of stains almost always require more advanced techniques, like careful sanding and refinishing.
Trying to aggressively scrub these spots often does more harm than good, potentially stripping the finish and making the problem much worse. If you have a dark stain or a deep ink mark, it’s best to consult a professional restorer.
For a more detailed breakdown of what you can tackle yourself, you might be interested in our guide on how to remove furniture stains. Knowing when to stop is just as important as knowing how to start.
Knowing When to Call a Professional Restorer
We’ve been in the furniture business since 1902, so believe us when we say we love a good DIY fix. There’s a lot you can accomplish with a little elbow grease. But we also know that true wisdom is recognizing when a job is too big to tackle on your own.
Some damage goes far beyond what a simple cleaning can handle. Attempting to fix these bigger issues yourself can sometimes turn a small problem into a permanent, heartbreaking one. It’s crucial to know the signs that it's time to find a reputable local restorer to give your cherished pieces the expert care they truly deserve.
Signs It Is Time for an Expert
If you spot any of the following issues on your wood furniture, it’s best to step back and seek professional help. Pushing forward with a DIY remedy can easily cause more harm than good.
Deep Scratches or Gouges: We’re not talking about minor surface scuffs. Scratches that have broken completely through the finish and dug into the bare wood below can't just be polished away.
Extensive Water Damage: While you can often handle minor white water rings, significant damage is a different story. Look for dark black stains, warped wood, or a finish that's bubbling and lifting—these are all red flags for deep moisture penetration. You can learn more about why you shouldn't DIY water damage restoration to understand the risks.
Peeling or Chipping Veneer: When that thin, beautiful layer of wood veneer starts to lift, bubble, or chip off, it’s not a simple glue job. Repairing it seamlessly requires specialized adhesives, clamping techniques, and a skilled hand.
Significant Structural Issues: Wobbly legs, loose joints, or cracked frames aren’t surface-level problems. These issues compromise the furniture's very construction and safety. They need to be addressed by someone who specializes in structural furniture repair to ensure the piece is stable and sound.
At Guynn Furniture, we know there’s a big difference between routine care and major restoration. If you have serious damage that needs a specialist’s touch, we can help you find a trusted restorer in the Southwestern Virginia or Northern North Carolina region.
For problems that are less severe, you can always check out our guide on how to handle common furniture stains to see what you can safely manage at home. But when it comes to the big stuff, calling a professional ensures your furniture will be around for the next generation to enjoy. If you're ever unsure, feel free to reach out to our team through our service request form and we'll point you in the right direction.
Frequently Asked Questions About Wood Furniture Care
We get a lot of great questions in our showrooms across Galax, Independence, and Hillsville. Here are answers to a few of the most common ones we hear from our neighbors about keeping their wood furniture looking its best.
How Often Should I Polish My Wood Furniture?
This is a great question, and the answer is probably much less often than you think. It's easy to assume that more polish means more protection, but over-polishing is a real problem.
Using commercial sprays too often, especially those with silicone, creates a cloudy, sticky buildup that actually attracts more dust. For most modern pieces with sealed finishes, like you'd find on today's La-Z-Boy or Bassett furniture, a good polish is only needed once or twice a year.
Your best move is to focus on regular, gentle dusting with a damp microfiber cloth. When it is time to polish, use a very small amount of a quality, silicone-free product and buff it thoroughly with a clean, dry cloth until the surface is smooth.
Are All-in-One Dusting Sprays Safe for My Good Furniture?
We always advise caution with "all-in-one" dusting sprays, particularly on high-quality or antique furniture. While they offer a quick shine, many of these products contain silicones, oils, and propellants that can leave behind a hazy film.
Over time, this film can become difficult to remove and may ultimately obscure the natural beauty of the wood's finish. It builds up in a way that dulls the piece you fell in love with.
For the beautiful, lasting finishes on brands like Ashley, Therapedic, and Bassett, we stand by the simplest method: a clean, slightly damp microfiber cloth. This gentle approach has been trusted for generations—just like our family business since 1902—and it preserves the integrity of the finish for the long term.
Can I Use the Same Cleaner on My Dining Table and My Dresser?
Not always. This is a critical point that depends entirely on the furniture's finish, not its function or where it sits in your home.
Your dining table might have a tough polyurethane finish built to withstand daily spills and use. That antique dresser in the bedroom, however, could have a much more delicate lacquer, wax, or oil finish. Using a water-based cleaner on an oiled piece, for instance, can leave permanent spots.
If you're ever the slightest bit unsure, test your cleaner on an inconspicuous spot first—like the back of a leg or the underside of a shelf. When in doubt, just stick with a dry or lightly dampened microfiber cloth.
What Is the Best Way to Clean Detailed Carvings?
Those beautiful, intricate carvings can definitely be dust magnets. The trick is getting into all the small details without using anything that might scratch the wood or leave behind residue.
A soft, natural-bristle brush is your best friend here. A clean makeup brush or a small, soft-bristled paintbrush works perfectly.
Start by gently brushing the loose dust out of all the crevices. For a deeper clean, you can dip the very tips of the brush into a mild cleaning solution, carefully work it into the details, and then immediately blot the area dry with a clean cloth. This lifts the grime without soaking the wood.
At Guynn Furniture & Mattress, we believe caring for your furniture should be a simple and positive experience. With our Low Price Promise and a huge in-stock selection, you can find quality pieces for every budget without the wait.
Visit our showrooms in Galax, Independence, or Hillsville to test the comfort for yourself in a no-pressure atmosphere.
Schedule a consultation with our design team to start planning your dream room today.
Or browse our incredible in-stock selection online at guynnfurniture.net for pieces available for our fast, free in-home delivery and setup within 60 miles.