A Neighbor’s Guide to Fixing Scratches on Leather Furniture
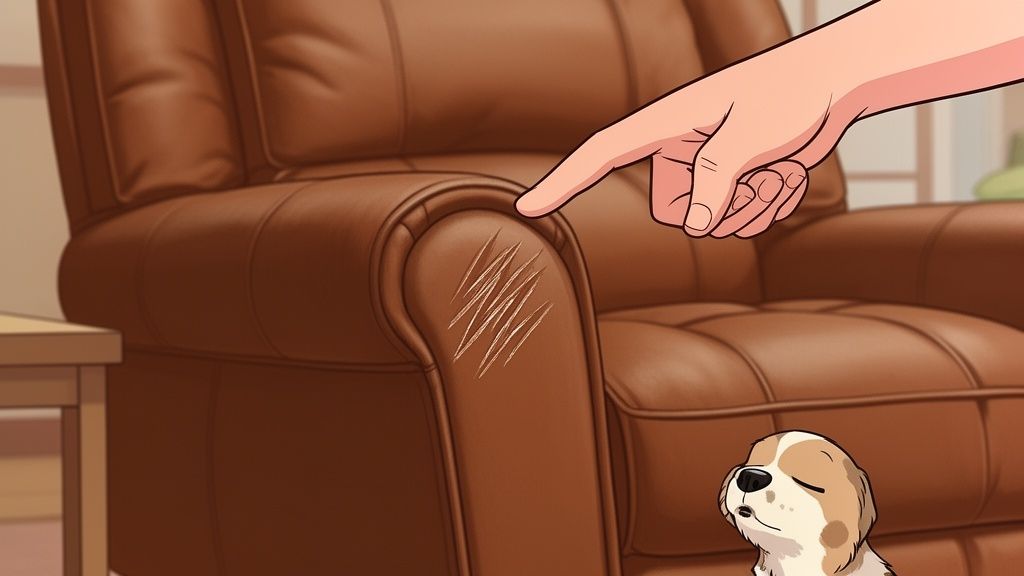
That sinking feeling is something we all know. You sit down in your favorite leather recliner only to spot a fresh scratch marring the surface. It happens in the best homes across Southwestern Virginia, whether from a pet's claws, a stray toy, or just everyday life. We understand how disheartening that can be, especially when you've invested in a piece you love.
But don't worry—that mark doesn't have to be permanent. Our family is here to help yours.
Your Guide to Fixing Scratches on Leather Furniture
As your neighbors in the furniture business since 1902, we at Guynn Furniture understand that furniture is part of your home's story. Seeing it damaged is tough, but most light scratches are much simpler to fix than you might think. A little know-how can save you significant money and stress.
Why Fixing Scratches Matters
For families in Galax, Independence, and the wider Hillsville region, a good sofa is an investment in comfort and togetherness. Unfortunately, it's an investment that often shows its wear. Scratches from claws or kids' rough play affect up to 70% of leather sofas within the first five years.
Considering professional repairs can run anywhere from $95 for a single fix to over $1,200 for widespread damage, learning simple home repairs is a fantastic way to protect your furniture's value. You can discover more about furniture market trends and see just how much proper care impacts longevity.
This guide is our way of sharing generations of experience. We'll walk you through simple, effective repairs you can do right at home, helping you restore that beautiful look so you can get back to enjoying your comfortable furniture.
We believe in empowering our neighbors. By learning to identify the type of scratch and choosing the right method, you can confidently handle most minor issues yourself. For those bigger jobs, or if you're ever unsure about your Ashley or Bassett pieces, our team is always here to help you decide the best next step in our no-pressure atmosphere.
Figuring Out Your Leather and Sizing Up the Damage
Before you can fix any scratches on your leather furniture, you have to play detective for a minute. Not all leather is created equal, and using the wrong repair method can quickly turn a small scuff into a big, noticeable problem. It's just like cleaning floors—you wouldn't use the same product on a wool rug as you would on tile. The same idea applies here.
Most of the family-friendly sofas you'll find in homes across Southwestern Virginia, including durable pieces from top brands like La-Z-Boy, Ashley, and Bassett, are made with a protected or finished leather. This type has a tough topcoat that makes it much more resistant to stains and scratches. On the flip side, you have more delicate types like aniline leather, which are loved for their buttery-soft, natural feel but are far more absorbent and prone to damage.
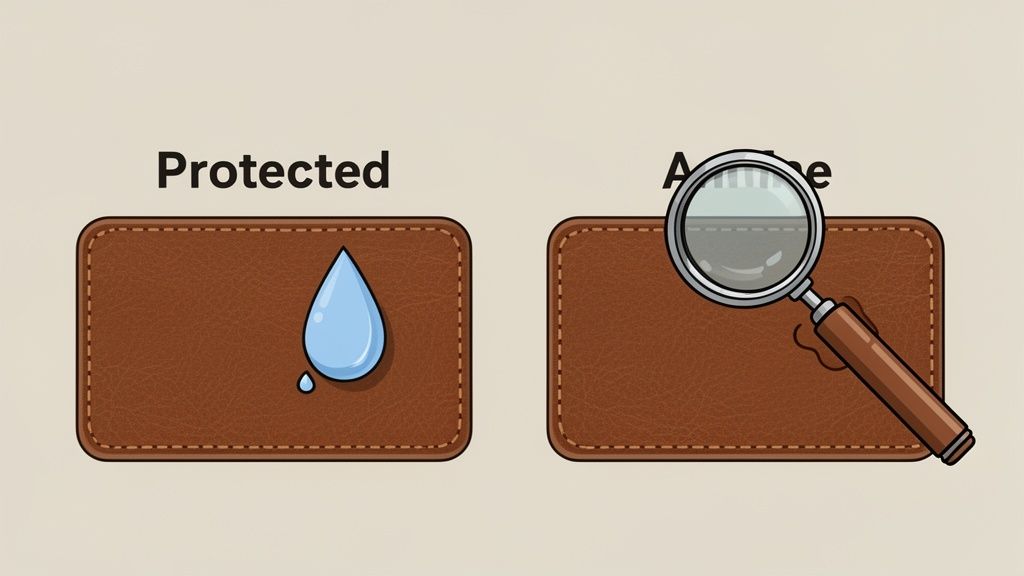
A Simple Test to See What You're Working With
So, how can you tell the difference? The easiest way is with a quick water drop test. Find a hidden spot on your sofa—the back, or maybe underneath a cushion—and place a single drop of water on the surface.
- If the water beads up and sits there: You almost certainly have protected leather. That topcoat is doing its job by repelling the liquid. This is great news, as it’s the most common type and generally the easiest to repair yourself.
- If the water soaks in right away: You’re likely dealing with aniline or nubuck leather. This kind of material requires a much more delicate touch. For anything more than a tiny scuff, it might be a job best left to a professional.
Getting a handle on your material is the most important first step. For a deeper dive, you can explore everything you need to know about upholstery materials right here on our blog.
How to Tell How Bad the Scratch Really Is
Once you know your leather type, it’s time to get a good look at the scratch itself. The depth of the damage is what will dictate your repair strategy. Get up close and really examine the mark.
The key difference to look for is whether the scratch has only discolored the surface or if it has actually broken through the leather's top layer. This distinction is everything when it comes to choosing the right fix.
A simple way to check is to gently run your fingernail across the scratch. Does it feel mostly smooth, or does your nail catch in a groove?
- Surface Scuffs: These are often just marks on the protective coating. They might look lighter or darker than the surrounding leather but will feel smooth to the touch. These are the most common kind of damage and are typically the easiest to fix at home.
- Deeper Scratches: If you can feel an obvious indentation or if the scratch has a rough, fuzzy texture, it means the damage has gone past the finish and into the leather hide itself. These require a bit more work, usually involving a filler and some color matching.
- Gouges or Tears: A really severe scratch may have actually torn the leather, exposing the lighter-colored suede layer or even the stuffing underneath. This level of damage calls for a much more intensive repair process.
Taking a few minutes to properly identify your leather and assess the damage sets you up for success. It ensures you use the right tools and techniques, protecting your beautiful furniture for many more years of family gatherings in your Galax, Independence, or Hillsville home.
How to Fix Minor Scratches and Surface Scuffs
For those lighter scratches that haven’t actually torn the leather, a gentle touch is often all you need. This is great news for families in Hillsville and Independence, since these are the most common marks from daily life—the kind left behind by a wayward buckle or a pet jumping up for a cuddle.
Think of this as first aid for your furniture. You're not performing major surgery, just dressing a surface wound to bring back its healthy, uniform appearance. With a few simple items from around your home, you can often make these minor scratches virtually disappear.
Start with a Clean Slate
Before you can fix anything, you have to work with a clean surface. Dust, oils, and everyday grime can get in the way of a good repair, preventing conditioners or dyes from absorbing properly. This step is non-negotiable and only takes a moment.
First, take a soft, dry microfiber cloth and gently wipe down the scratched area and the space immediately around it. The goal is just to remove any loose debris.
If the area is a bit grimy, lightly dampen a separate clean cloth with water and a tiny drop of mild, pH-neutral soap. Wring it out so it’s almost dry, then gently wipe the spot. Follow up immediately with a dry cloth to lift any moisture. Never saturate the leather with water, as this can cause its own set of problems, from water stains to stiffness.
A clean, dry surface is the foundation of any successful leather repair. Skipping this step is like trying to paint a dusty wall—the results just won't stick.
The Gentle Buffing Method
For the faintest of scratches, especially on protected leather common in brands like La-Z-Boy or Ashley, a simple buffing technique is surprisingly effective. This method works by redistributing the existing color and oils in the leather's finish to cover up the mark.
All you need is a clean, dry microfiber cloth. Using your fingertip through the cloth, buff the scratch in a gentle, circular motion. It's best to start from the outside of the scratch and work your way toward the center. This helps blend the repair seamlessly without making the area look overworked.
Keep this gentle motion going for a minute or two. You might be surprised to see the scratch start to fade right before your eyes. It’s the least invasive method, so it’s always the best one to try first.
Introducing Leather Conditioner
If buffing alone doesn't quite do the trick, it's time to bring in a quality leather conditioner. A good conditioner nourishes the leather, restores essential moisture, and can help darken light scratches so they match the surrounding area. Think of it like a moisturizer for your skin—it restores flexibility and color.
Apply a very small amount of leather conditioner to your clean microfiber cloth, not directly onto the furniture itself. Gently rub the conditioner into the scratch, again using a soft, circular motion. Be sure to feather it out into the surrounding leather to ensure an even blend.
Let the conditioner sit and absorb for at least an hour, or whatever the product's instructions recommend. Afterward, take another clean, dry cloth and buff the entire area to a soft sheen. This often provides enough color and moisture to make minor scratches vanish completely.
A Professional Trick Using Mild Heat
Here’s a tip we’ve shared with our neighbors in Galax for years. For slightly more stubborn surface scuffs, a little bit of mild heat can work wonders. Heat gently warms the natural oils and dyes already in the leather, encouraging them to rise to the surface and fill in the lighter-colored scratch.
You'll need a hairdryer for this.
- Set it to Low: Put your hairdryer on its lowest heat setting. High heat can damage or shrink the leather, so always start low and go slow.
- Keep it Moving: Hold the hairdryer about 6-8 inches away from the scratch and move it back and forth continuously. Never let it sit in one spot.
- Massage the Area: As the leather warms up, use your fingers or a microfiber cloth to gently massage the area. This helps the oils and dyes migrate into the scratch.
You should see the scratch begin to darken and blend in. Once it has faded to your satisfaction, apply a light coat of leather conditioner to replenish moisture. This is an incredibly effective method, but it’s one to use with care. If you're nervous, always test it on an inconspicuous area first.
Just like with any home project, taking your time is key. These gentle methods are often all it takes to keep your furniture looking its best. Of course, dealing with scratches is only half the battle; knowing how to handle other marks is just as important. For more helpful tips, you can check out our guide on how to remove furniture stains to keep all your pieces pristine.
Repairing Deeper Gouges in Your Leather Furniture
When you run your fingernail over a scratch and it snags, you're dealing with more than just a surface scuff. That's a deep gouge—one that’s broken through the leather’s protective topcoat and dug into the fibers below. It might look intimidating, but fixing these bigger scratches is absolutely doable for a patient homeowner.
For our neighbors here in Galax and across Southwestern Virginia, we know furniture from great brands like La-Z-Boy and Bassett is an investment meant to last. A deep scratch doesn’t have to be a death sentence for your favorite recliner. With the right approach, you can pull off a nearly invisible repair that brings it right back to life.
This is a bit more involved than just buffing a mark out. It means adding a new material—a flexible filler—to level the damaged spot before you can recolor it. Think of it like patching a small hole in a wall before you paint; the prep work is everything.
Preparing the Damaged Area for Repair
Before you can even think about filling the gouge, you have to create a clean, stable surface for the repair products to grab onto. Any dirt, oil, or loose leather fibers will get in the way and can cause the fix to fail down the road.
Start by cleaning the area well with a proper leather cleaner or a simple solution of mild soap and water on a lightly damp cloth. Be sure to dry it immediately with a clean microfiber towel.
Next, you need to handle any rough or frayed edges around the scratch. Grab a very fine-grit sandpaper (600-grit or higher) and gently sand the edges of the gouge. Your goal here is just to smooth out any snags, not to make the scratch bigger. Once you’re done, wipe away the dust with a cloth slightly dampened with rubbing alcohol. This gets the area perfectly clean and ready for filler.
A Pro Tip from Our Team: Always, always test your cleaner or the rubbing alcohol on a hidden spot first—like under a cushion or on the back of the sofa. This little step ensures it won’t discolor your specific piece of furniture.
Applying Leather Filler for a Seamless Surface
The magic ingredient for these deeper repairs is a heavy leather filler, sometimes called a leather compound. It’s a thick, flexible paste that fills in the void left by the scratch, creating a new, smooth surface that sits flush with the rest of the leather.
Using a small plastic applicator tool (which often comes in repair kits), work a thin layer of the filler directly into the gouge. The key here is to build it up in thin layers, not to slather on one thick glob.
- Apply the first thin layer: Really focus on pushing the filler deep into the base of the scratch.
- Let it dry completely: This might take 30 minutes or a few hours, depending on the product and the humidity in your home. A hairdryer on a low, cool setting can help speed things up.
- Repeat as needed: Keep adding thin layers, letting each one dry fully, until the filler is sitting just a tiny bit above the leather’s surface.
Once that final layer is dry, use your fine-grit sandpaper again to gently sand the filled area. You want it to be perfectly level and smooth with the surrounding leather. Wipe off the dust, and you should have a repair that you can’t even feel.
This diagram shows a simplified three-step process for a much more minor scratch, but the core principle of cleaning and treating the area is the same for deeper repairs.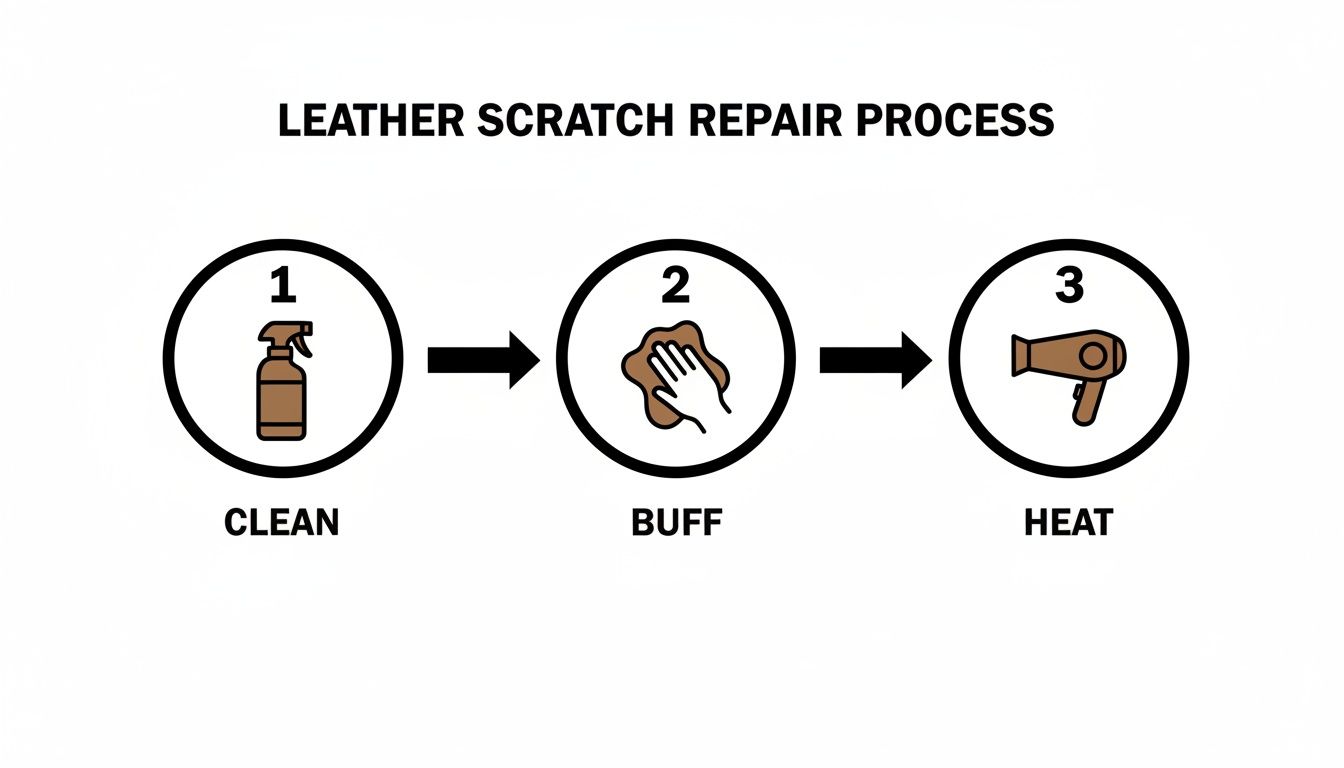
The main takeaway is that a good repair always starts with a clean, prepped surface—whether you're buffing out a light scuff or filling a deep gouge.
To make sure you're ready, here’s a quick checklist of the tools you'll likely need.
Essential Tools for Leather Scratch Repair
| Tool or Material | Purpose in Repair | Best For (Minor/Deep Scratches) |
|---|---|---|
| Leather Cleaner | Removes dirt, oils, and grime for proper adhesion. | Both |
| Microfiber Cloths | Used for cleaning, drying, and applying products. | Both |
| Fine-Grit Sandpaper (600+) | Smooths rough edges and levels filler. | Deep Scratches |
| Rubbing Alcohol | Final cleaning step to de-grease the repair area. | Deep Scratches |
| Heavy Leather Filler/Compound | Fills in the void of a deep scratch or gouge. | Deep Scratches |
| Applicator Tool | Spreads filler and colorant evenly. | Deep Scratches |
| Leather Colorant/Dye Kit | Recolors the repaired area to match the original. | Both |
| Leather Sealant/Topcoat | Protects the finished repair and matches the sheen. | Both |
Having these items on hand before you start will make the whole process go much more smoothly.
Color Matching and Sealing the Repair
Now for the part that really makes the repair disappear: the color. Most leather repair kits come with a base colorant and several tints (like black, white, and yellow) that you can mix to get an exact match for your furniture.
Start by putting a tiny dab of the base color on a piece of paper to see how close you are. Then, add minuscule drops of the tints to adjust the shade. Once you think you have it, test your color on that same hidden spot before you put it anywhere near the repair. When you’ve got a perfect match, use a small sponge or applicator to dab the color onto the filled area, feathering it out at the edges to blend everything seamlessly. Let it dry, and add a second coat if it needs it.
Finally, you have to protect your hard work. A leather sealant or topcoat creates a durable finish over the color that matches the original sheen of your furniture (whether it's matte, satin, or glossy). Apply a thin layer over the repaired spot and let it cure completely, which can take up to 24 hours. This final step locks in the color and protects the area from future scuffs and scrapes.
Taking on a deep scratch yourself can be incredibly rewarding. Plus, it's a smart way to preserve your furniture. In the U.S. furniture repair industry, fixing issues like scratches on leather actually makes up a whopping 52.2% of revenue. A professional fix often costs less than $200, which is a fraction of the $1,500-$3,000 price tag for a new sofa. That makes a good DIY repair an even more attractive, budget-friendly option if you're feeling up to the task, and aligns with our Low Price Promise.
And if you ever find the perfect color is just out of reach, remember our team can help. Learn more by exploring the process of getting started with a custom order to see how we can assist in finding solutions for your home.
Preventing Future Scratches on Your Leather
Now that you’ve put in all that work to get those marks out, let's talk about keeping them away for good. As a family-owned business serving the Galax community and the wider Southwestern Virginia / Northern North Carolina region since 1902, we’ve always believed the best repair is the one you never have to make. Being proactive is the secret.
Think of it like maintaining a car; a little regular attention prevents bigger, more expensive problems down the road. It’s a simple way to protect your investment and keep your beautiful leather pieces looking their best for years.
The Foundation of Prevention: Regular Care
The single best defense against scratches is keeping your leather healthy. When leather gets dry and brittle, it’s far more likely to scuff, crack, and show every little mark. A simple, consistent routine is all you need to maintain its natural strength.
Start by dusting your furniture once a week with a soft, dry microfiber cloth. This quick wipe-down stops tiny particles of dirt and grit from settling into the grain, where they can act like sandpaper over time.
Then, every few months, give it a bit more attention with a deeper cleaning and conditioning.
- Gentle Cleaning: Wipe everything down with a cloth that’s just slightly damp. You can use a dedicated leather cleaner or a very mild soap-and-water mix.
- Thorough Conditioning: Once it's completely dry, apply a high-quality leather conditioner. This is the most important step—it replenishes the natural oils, keeping the material flexible and much less prone to damage from daily life.
Maintaining the overall health and cleanliness of your leather furniture can play a role in preventing future scratches and wear; consider exploring professional cleaning services for comprehensive care.
Smart Strategies for Homes with Pets and Kids
For so many of our neighbors in Hillsville and Independence, pets and kids are part of the family—but they sure can be tough on furniture. The good news is you don’t have to choose between a beautiful home and your loved ones.
Your living room should be a place for comfort, not constant worry. A few simple adjustments can create a space that’s both stylish and durable enough for the entire family, including the furry members.
If you have cats or dogs, keeping their nails trimmed is your most effective first line of defense. Regularly clipped nails are far less likely to cause deep gouges if a pet jumps on or off the sofa.
Another great trick is to use stylish, dedicated throws or blankets on the spots where your pets love to lounge. This creates a protective barrier that also adds a cozy, decorative touch. We’ve helped countless families find this balance, and you can get more great ideas in our guide on how to choose kid-friendly and pet-friendly furniture.
Strategic Furniture Placement
Sometimes, preventing scratches is as simple as thinking about where your furniture lives. High-traffic areas are magnets for accidental bumps, scuffs from bags, and scrapes from people walking by.
Take a quick look at your room's layout. Is that beautiful La-Z-Boy recliner positioned right where everyone cuts through the room? Is the arm of your Ashley sofa vulnerable to getting scraped by a nearby doorway?
Even a slight rearrangement can make a huge difference. Try to create clear pathways around your leather pieces, leaving a few extra inches of breathing room in those busy zones. You should also be mindful of direct sunlight, which can dry out and weaken leather over time, making it much more susceptible to damage.
This kind of thoughtful placement is a simple, no-cost way to extend the life of your furniture. It’s all part of making your home comfortable and functional, backed by our promise of Free in-home delivery and setup within 60 miles for all our neighbors in Southwestern Virginia and Northern North Carolina.
When It’s Time to Call a Professional for Leather Repair
While we love empowering our neighbors to handle home projects, we also know there are times when it’s best to call for backup. Some scratches on leather demand a level of skill and specialized tools that go far beyond a simple DIY kit. The hard truth is that making the wrong move on a serious issue can quickly turn a fixable problem into a permanent one.
Knowing that difference can save you a world of time, money, and frustration. It’s always smarter to pause and assess than to push forward with a repair you aren’t 100% confident about.
Signs It's Time for Expert Help
Certain types of damage are clear red flags that you need a professional touch. If you run into any of these, we strongly recommend seeking an expert opinion:
- Widespread Cracking: If the leather surface looks like a dry riverbed with tons of fine cracks, it usually points to a deeper issue with moisture loss that a surface kit just can't fix.
- Large Rips or Tears: Any gash longer than a couple of inches needs more than filler. A pro knows how to properly sub-patch the area from behind, which is the secret to a strong, nearly invisible repair.
- Damage on Delicate Leathers: Materials like aniline or nubuck are beautiful but incredibly absorbent and unforgiving. One wrong move can easily lead to permanent dark spots or stiffness.
- Antique or Heirloom Pieces: That cherished armchair from your grandmother probably has unique tanning processes and finishes. For particularly beloved pieces or significant damage, considering expert antique furniture restoration ensures your heirlooms get the specialized attention they deserve.
If you find yourself staring at a scratch and feeling completely out of your depth, that’s your sign. Trust your gut. A professional has the experience to assess the damage properly and restore your piece without the guesswork.
And if you're ever unsure about a piece you bought from us, our expert design staff at our Galax, Independence, or Hillsville locations are here for you. We can take a look at the situation and, if a repair isn't the best path forward, help you explore beautiful, durable replacements from our large in-stock selection, available for immediate delivery.
We want you to feel confident and happy in your home, and sometimes that means knowing when to request professional service to get the job done right.
Here are some of the most common questions our family hears from neighbors in Galax, Hillsville, and Independence about keeping their leather furniture looking its best.
Can I Use Olive Oil on a Light Scratch?
We get this one a lot. While olive oil is a popular home remedy you'll see online, we really advise against using it or any other cooking oils on your leather. It might look like a quick fix, but over time, these oils can actually darken the leather unevenly and attract a surprising amount of dust and grime.
It's always a safer bet to stick with a conditioner made specifically for leather upholstery. It's designed to nourish the material without leaving a sticky residue or causing long-term discoloration.
Will a Leather Repair Kit Work on Any Leather?
Most of the DIY repair kits you find are designed for protected or pigmented leather. This is the most common type used for family-friendly furniture from brands like Ashley, Bassett, and even our premium La-Z-Boy recliners because it's built to be durable.
However, those kits can be too harsh for more delicate leathers like aniline or nubuck. They can damage the natural, soft finish that makes those types so special.
Our biggest piece of advice: always, always test any kit on a small, hidden spot first. Under a cushion or on the back near the floor is a perfect place. This little step ensures the product is compatible with your furniture’s specific finish before you commit.
How Often Should I Condition My Leather Furniture?
For most homes here in Southwestern Virginia and Northern North Carolina, conditioning your leather every 6 to 12 months is the sweet spot. This simple routine keeps it moisturized, supple, and much more resilient against everyday scuffs and scratches.
If your furniture sits in direct sunlight or you have a particularly dry room, you might want to do it a bit more often—maybe every 4 months. Honestly, this is one of the single best things you can do to prevent future damage and keep your leather from our great brands like Sealy and Therapedic feeling new.
At Guynn Furniture & Mattress, we're committed to helping you love your home for a lifetime. If you have more questions or need help finding the perfect piece, our family is here for you.
Visit our showrooms in Galax, Independence, or Hillsville to test the comfort for yourself.
Schedule a consultation with our design team to start planning your dream room today.
Browse our selection online at guynnfurniture.net.